
Emulating Inmagic DB/TextWorks databases with QEMU
A while ago, colleagues from our imaging studio approached me about an old Inmagic DB/TextWorks database. The database was originally created around the year 2000, and contained information about photographed items from our collection. From an old machine of a retired former colleague, they had recovered both the database, and installer files of two versions of the DB/TextWorks software. However, they were unable to either read the database with modern software, or to get the original software running on modern hardware.
The obvious solution would be to run the software in an emulated environment, and use the emulation to export the database to a more readable format. Oracle VirtualBox used to be my go-to software for such emulation jobs. As I’m trying to move away from (US-based) big tech software, this time I decided to give QEMU a try instead. Although I’ve used QEMU before, it’s been quite a while, and I noticed that a lot of online QEMU resources are quite outdated, which can make things confusing if you don’t know where to look.
The main goal of this post is to document the main steps that make up a “migration through emulation” use case like this:
- The installation of QEMU.
- The creation of a virtual machine (VM) in QEMU, and the installation of an operating system (in this case Windows XP).
- The use of a “virtual thumb drive” to exchange data between the VM and the host machine.
Even though this specifically covers the Inmagic DB/TextWorks case, most of this will be applicable to other “migration though emulation” use cases as well.
In the final section I also give an overview of the general file structure of a DB/TextWorks 7.0 database, and I provide two openly-licensed example databases.
Software
The data recovered by my colleagues included two versions of the DB/TextWorks software: version 3.0 version from 1998, version 7.0.1 version from 2004. Since the time stamps of the database files indicated they were created in 2000, I went for the 7.0.1 version. Its documentation lists the following requirements:
- Windows 2000 + Service Pack 3 or Windows XP.
- Internet Explorer 5.01 or later, which is needed “for certain features to work properly”.
I happened to have an ISO image of an old installation CD of Windows XP (Home Edition) lying around, which made XP the obvious emulation target. This also comes with a compatible Internet Explorer version preinstalled.
Host system
As a host system I used a desktop PC running Linux Mint 22.3 (MATE 64-bit).
Install QEMU
Installation of QEMU is as simple as1:
sudo apt install qemu-system
Create virtual machine
In an empty directory, create a sufficiently large (here: 10 GB) image file2 (here called “winxp.img”):
qemu-img create -f qcow2 winxp.img 10G
Then copy the ISO image of the Windows XP installation CD (“winxp.iso”) to the same directory. Now start a virtual machine (VM) using:
qemu-system-x86_64 -m 1024 -hda winxp.img -cdrom winxp.iso -boot d
This boots up a VM that runs the Windows XP setup program3. To test the installation, close down Windows, and start the VM using:
qemu-system-x86_64 -m 1024 -hda winxp.img
If all goes well, this should boot the VM running Windows XP.
Data exchange between VM and host machine
In its current state, there’s no way to exchange data between the VM and host machine. For our use case, we need this to:
- Make the Inmagic DB/TextWorks installation files and the database available to the VM.
- Make the exported database from the VM available to the host machine.
There are a couple of ways to achieve this. In this case I opted for a “virtual thumb drive” approach, which works similarly to how you would use a physical thumb drive to exchange data between two machines.
Create virtual thumb drive
Start by creating a 200 MB disk image (“tw.img”):
dd bs=512 count=390625 if=/dev/zero of=tw.img
Then format this disk image as a FAT 32 filesystem4:
mformat -F -i tw.img
Copy data from host to virtual thumb drive
I used the mcopy tool to copy the required data from my host machine to the virtual thumb drive. In my case the data are in a directory tree under /home/johan/kb/beeldstudio-textworks/Dbtmsg/. The following command recursively copies everything in that directory to the virtual thumb drive:
mcopy -i tw.img -s /home/johan/kb/beeldstudio-textworks/Dbtmsg/ ::
You can verify the result by mounting the image file on your host machine. In Linux Mint, right-click the file in the file manager, and then select “Open with Disk Image Mounter”.
Start VM with virtual thumb drive
The following command starts up the Windows XP VM, and mounts the virtual thumb drive as a removable USB device:
qemu-system-x86_64 -m 1024 -hda winxp.img \
-drive if=none,id=usbstick,format=raw,file=tw.img \
-usb \
-device usb-ehci,id=ehci \
-device usb-storage,bus=ehci.0,drive=usbstick
In my case the virtual thumb drive is available as the “E:” drive in Windows XP. Note that it can take some time before Windows detects the device, so be patient here.
Inmagic DB/TextWorks installation
To install DB/TextWorks, open Windows Explorer, navigate to the folder with the installer files on the virtual thumb drive (in my case the “E:” drive on the WinXP VM), and run setup.exe.
Open a database
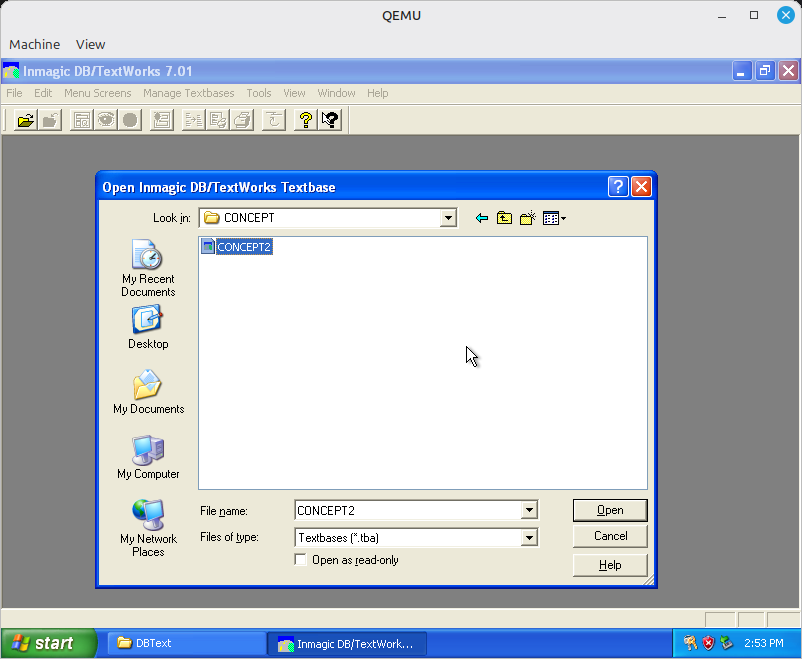
A DB/TextWorks database is made up of various separate files that share a common base name. The primary entry point is a file with a “.TBA” file extension. To open a database, select “Open” from the “File” menu, and navigate to the folder on the virtual thumb drive that contains the database:
After loading, DB/TextWorks shows a window with all fields in the database:
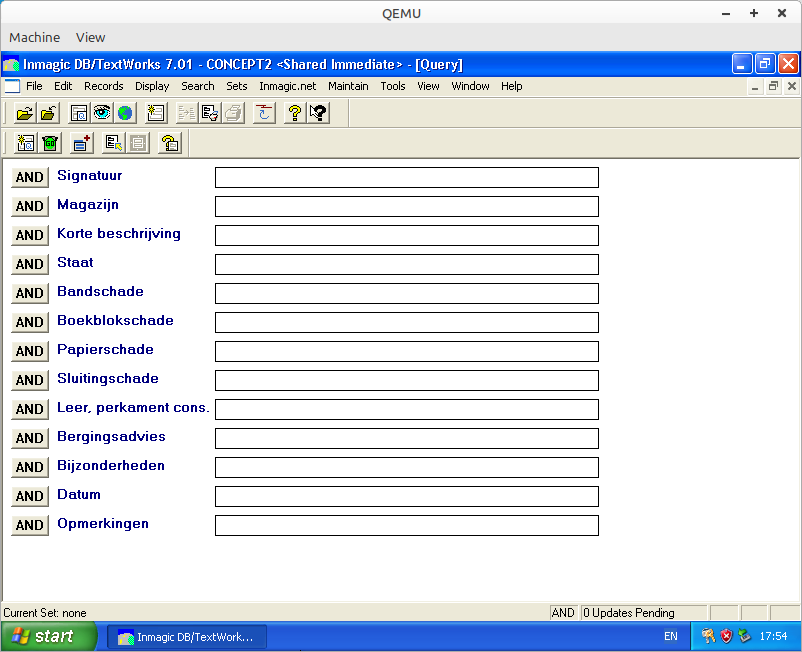
It’s a good idea to make a screenshot of this, as the CSV exports don’t contain the full field names!
Export database to comma-delimited text
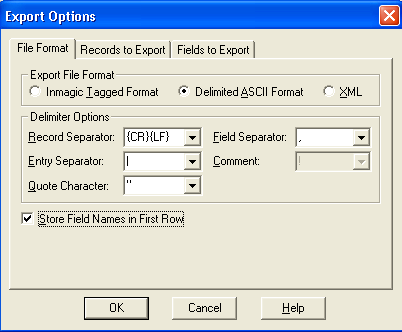
From the “File” menu, select “Export …”, navigate to a location on your virtual thumb drive where you want to store your export, and enter an output file name. In the Export Options dialog that appears, select “Delimited ASCII Format” as the output format5, and make sure to check the “Store Field Names in First Row” checkbox.
Click “OK” to start the export. When done, close DB/TextWorks, and shut down the virtual machine.
Access the exported database from the host machine
To access the exported database from the host machine, simply mount the virtual thumb drive image file. In Linux Mint, you can do this by right-clicking the file in the file manager, and then selecting “Open with Disk Image Mounter”. Now you can access the file system, and copy the exported file to the host machine’s file system.
Some observations on the exported CSV files
The column headings in the exported CSV files only shows the first two characters of each field’s name. For instance, in my case the database contains the fields “Signatuur” and “Magazijn”, which show up as “SI” and “MA” in the exported file. I wasn’t able to change this behavior. Because of this, it’s a good idea to make a note (or a screenshot) of the full names from the DB/TextWorks interface.
Another thing that caught my attention is that DB/TextWorks variables may contain multiple entries. In that case, each comma-separated item in the exported file is sub-divided in fields that are separated by pipe (“|”) characters.
Database structure
Each DB/Textbase database is made up of multiple files. These files share a common base name, but each has a different file extension. The User Manual gives the following overview6:
Extension Description .TBA Primary textbase definition file, which also contains textbase elements (for example, forms, query screens, sets, record skeletons) stored in the textbase. .ACF Access control file; controls simultaneous access to the textbase by multiple users or software instances, or applications (for example, DB/Text PowerPack Lite). .DBS Textbase structure file; contains field definitions and other information about the structure of the textbase. .IXL Indexed list file; contains the validation and substitution lists, and the leading article and stop word lists. .DBR Contains the records (including deferred new, deleted, or changed records). .DBO Contains a directory to the records in the .DBR file. .SDO Contains a directory to records with deferred updates in the .DBR file. .BTX Contains the Term and Word indexes. .OCC Contains the lists of records indexed by the terms and words in the .BTX file. .LOG Optional textbase log file; lists changes to the textbase structure and records. .TML Thesaurus maintenance locking file, prevents more than one person at a time from modifying records in that thesaurus textbase. Note that .TML files do not have to be backed up. The software automatically creates them if they do not exist. .HLP Optional textbase-specific help file. .INI Optional file used with Copy Special applications, Textbase-Specific Help, the DB/Text ODBC Driver, and the Applications menu. .SLT Optional file that is created when EnableSlotlog=1 appears in the [Advanced] section of the DBTEXT.INI or textbase .INI file. This option can be set in DBTEXT.INI during Setup using the Track Textbase Access button on the Configuration dialog box. The machine name and login name of each user who has a textbase open is recorded in the .SLT file. The line is cleared when each closes the textbase.
Example databases
Since DB/TextWorks running already, I though it would be useful to use it to make some sample files. I created two simple databases: one with DB/TextWorks 7.0.1, and another one with the older DB/TextWorks 3.0. I added both to the OPF Format Corpus.
Further resources
- DB/TextWorks sample files in the OPF Format Corpus.
- DB/TextWorks Versions and Features.
- DBTextWork User’s Manual (this documents version 9, which is slightly more recent than version 7 covered in this post).
- Inmagic® DB/TextWorks® and DB/Text® WebPublisher PRO Version 9.00 README File (also covers version 9).
- QEMU/Windows XP.
- How to Activate Windows XP in 2024 - method 3 (Disabling Activation) is a Windows registry hack that disables activation altogether, which is useful for VMs with no internet access.
-
The actual file size is much smalller, because qemu uses compression. ↩
-
Note that the Windows XP setup process requires you to enter a 25-character product key. ↩
-
This requires the mtools package. If I’m not mistaken this comes preinstalled with most Linux distributions, but if needed you can install it using
sudo apt install mtools. ↩ -
TextWorks 7 also supports XML as an export format. ↩
-
Taken from the User Manual of version 7 of the software, which is not available online. A copy of the more recent version 9 User Manual is available here. ↩
-
DB/TextWorks

Comments